Visual Studio Tutorials
Check out these articles and learn how to use the Visual Studio too in order to create and deploy projects.
Deploying Visual Studio projects to IIS
Check out this article and learn how to deploy Visual Studio projects to Internet Information Services.
In order to run any visualization project created with Visual Studio, the project must be deployed to Internet Information Services.
The first step after the project is built in Visual Studio is to navigate to C:\Users\UserName\Documents\Visual Studio 2013\Projects\SilverlightApplication and copy the folder SilverlightApplication.Web to C:\inetpub\wwwroot.
UserName is an example user name. This must be replaced with the real Windows user name.
The location of the project folder depends on the version of Visual Studio. It can be either Visual Studio 2013 or Visual Studio 2015, hence the difference in the project path.
SilverlightApplication is an example name. This must be replaced with the real name of your project.
After the folder is copied to the wwwroot folder of IIS, open the new folder and delete the following files:
obj folder
Properties folder
SilverlightApplication.Web.csproj
SilverlightApplication.Web.csproj.user
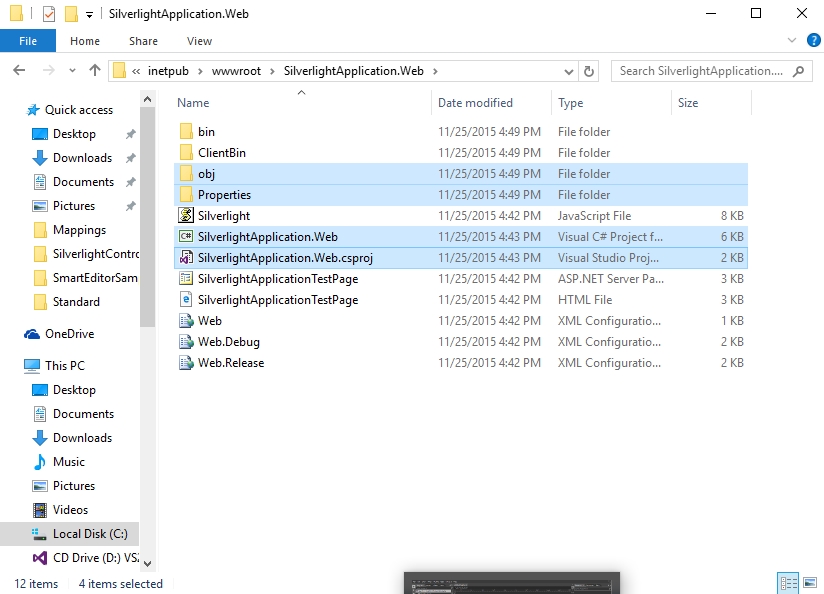
Deleting the files from the project folder
Now it is necessary to convert the web project into a web application. To do so, open Internet Information Services (IIS) Manager from Control Panel > System and Security > Administrative Tools.
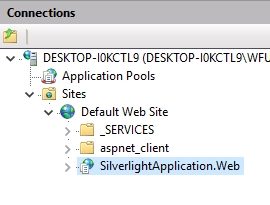
In the left panel, under Sites > Default Web Site, the SilverlightApplication.Web folder will be available.
Right click on the project folder and select Convert to Application.
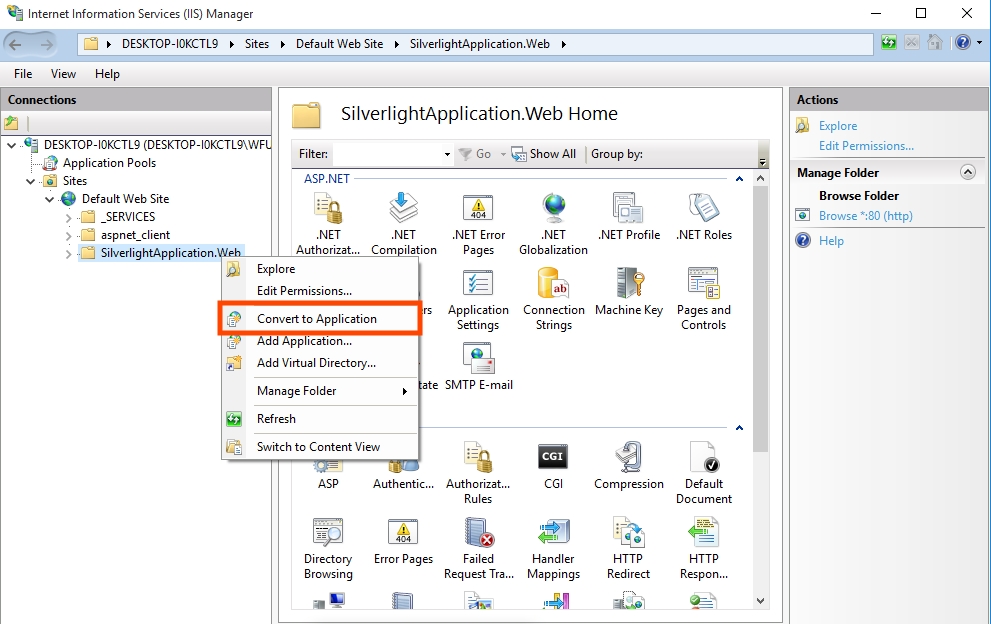
Convert the visualization project to application
In the Add Application window, click on Select... .
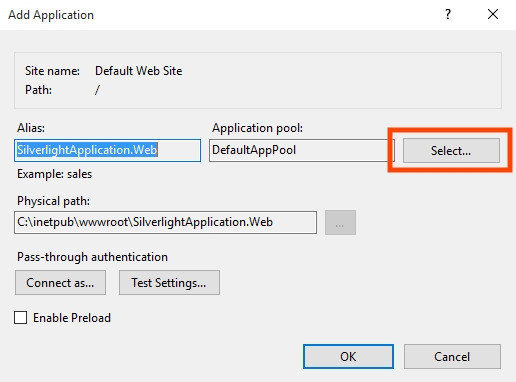
Add Application window in IIS
Select WEBfactory 2010_AppPool from the Application Pool drop-down menu and press OK.
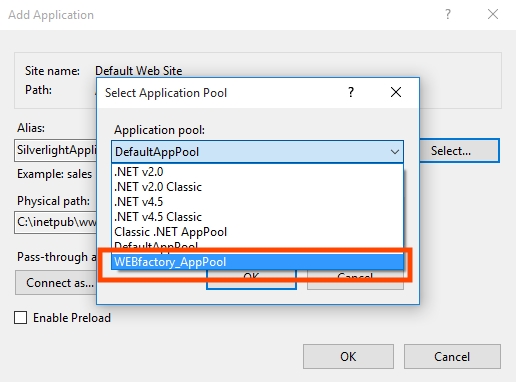
Select Application pool
Confirm the Add Application dialog by pressing OK. The folder inside the Connection panel will change into an application.
The new IIS application
Some specific visualization applications may require additional settings to be done in IIS. See Deploying the User Manager Visualization to IIS for reference.
Running the new application
To run the new application, go to Content View in IIS, right-click Default.asp and select Browse.
To access the application from a remote machine via local network or Internet, open a web browser and access the IIS root folder using the HTTP protocol:
http://[computer name or IP]/SilverlightApplication.Web/SilverlightApplicationPage.asp
http://[computer name or IP]/SilverlightApplication.Web
[computer name or IP] designates the actual ip/computer name of the machine running the IIS.
SilverlightApplicationPage is an example name. This will be replaced with the name of your asp page.
A Visual Studio project will have both asp page and html page. This can help if the application will be deployed to a non-asp web-server (the html will be used in that case).
If the application will be accessed via Internet or from a location that is in a different network than the machine running the IIS, the router must be configured in order to allow access to the IIS from outside the local network (port forwarding).
The process of deploying is complete. Now the application can be accessed from any location.
Creating a Trending (WFTrending3) visualization and loading configuration by code
Check out this article and learn how to manage an existing trending configuration into a trending control.
This tutorial will manage loading, by code, an existing trending configuration into a trending control.
The tutorial is divided in 4 steps:
Creating a simple Trending visualization in Visual Studio
Create a new Silverlight Application project in Visual Studio and name it TrendingControlVisualization.
Creating a the new project in Visual Studio
The WEBfactory 2010 Silverlight libraries need to be referenced in the project.
Right click on References under the UserManagerVS project in the Solution Explorer and select add reference.
Referencing the WEBfactory 2010 Silverlight libraries
In the Add Reference window select the Browse tab and navigate to C:/Program Files/WEBfactory 2010 /Silverlight/Standard (or C:/Program Files (x86)/WEBfactory 2010 /Silverlight/Standard if using a 64 bit system).
Select all the dll files in the Standard folder and click Ok to confirm. The process might take up to few minutes.
After the references are added, the project is prepared so we will head on to the next step.
In the XAML view of the MainPage, we need to insert the control. The code source will be taken from the libraries we referenced earlier.
First, we need to declare the necessary namespaces in the XAML code. Add the following lines in the XAML code of the MainPage, in the UserControl tag:
xmlns:WFCharts="clr-namespace:WFSilverlight.Charts;assembly=WFCharts"
xmlns:WFGeneral="clr-namespace:WFSilverlight.General;assembly=WFGeneral"
This namespaces will add the WFCharts and WFGeneral assemblies to the project.
The actual trending control WFTrending3 needs to be added in the XAML Grid.
Inside the Grid tags, place the WFTrending3 and name it TrendingControl:
<WFCharts:WFTrending3 x:Name="TrendingControl" Height="300" Margin="30,51,37,0" VerticalAlignment="Top" />
The result can be instantly seen in the design view.
Notice the Margin properties we defined from the start inside the TrendingControl. This margins are needed to define the placement and make room for another necessary control: the Button.
Loading a trending configuration will be made by pressing this button.
Next, add the Button and name it uxButton. Set the content of the button Config1:
<Button x:Name="uxButton" Content="Config1" HorizontalAlignment="Left" Margin="127,24,0,0" VerticalAlignment="Top" Width="75"/>
By default, the TrendingControl language is German. In order to change the language to English, we will need a third control, the Language Selector control. This is an optional step.
In order to add the Language Selector control, insert the following code after the User Login control:
<WFGeneral:WFLanguageSelector1 HorizontalAlignment="Left" Height="23" Margin="30,24,0,0" VerticalAlignment="Top" Width="75"/>
The XAML code should look like this:
The initial XAML code
NOTE
All the positioning options (margins, alignments) or size options can be modified based on the developers needs. The values in this tutorial are example values.
Press F6 to build the application or F5 to start the debugging and see the result in the browser.
The resulting visualization containing the Trending control, User Login control and the Language Selector control
If the Language Selector was inserted, it will appear nest to the User Login button.
The Config1 button will not load any configuration yet. The next steps will explain how to set up the visualization to load a desired configuration to the trending control.
Insert the method for loading the Trend configuration
In the following example, Config1 is the name of the predefined trending configuration
In order to load the trending configuration when the button Config1 is pressed, we need to insert a method that states that when clicking the button, the desired configuration is loaded:
private void Button_Click(object sender, RoutedEventArgs e)
        {
            TrendingControl.LoadConfiguration("Config1"); // Calls the configuration
        }
The above method will use the Click event named Button_Click, so we need to define that event in the Button XAML:
<Button x:Name="uxButton" Content="Config1" HorizontalAlignment="Left" Margin="127,24,0,0" VerticalAlignment="Top" Width="75" Click="Button_Click"/>Inserting the method for querying the configuration
In order to query the configuration in the trending control, we need to insert another method that states that when the configuration is loaded, it will start the query:
private void TrendingControl_OnTrendconfigurationLoaded(object sender, EventArgs e)
        {
            TrendingControl.StartQuery();
        }
Again, the method will use and event handler that we need to declare in the TrendingControl XAML:
<WFCharts:WFTrending3 x:Name="TrendingControl" Height="300" Margin="30,51,37,0" VerticalAlignment="Top" OnTrendconfigurationLoaded="TrendingControl_OnTrendconfigurationLoaded" />The code source of the visualization will look like this:
The code source of the Trending Control Visualization
The XAML will look like this:
The XAML of the Trending Control Visualization
Run and test the visualization by pressing F5.
To test the loading of the configuration, create a trending configuration and name it Config1, or change the configuration name in the method that calls the configuration, replacing it with the name of your predefined trending configuration.
Creating custom splash screen for Silverlight applications
Check out this article and learn how to create custom splash screen for Silverlight applications.
The following tutorial will guide you through the process of creating a custom splash screen for your existing Silverlight application. To be able to follow this tutorial, you will need a valid Silverlight application solution and Microsoft Visual Studio.
For tutorial purpose, we will provide the XAML code of a simple splash screen. The code is just an example and can be replaced by own splash screen codes.
Setting up the project
Open the desired project in Visual Studio. Make sure the project compiles with no errors.
Splash screen project
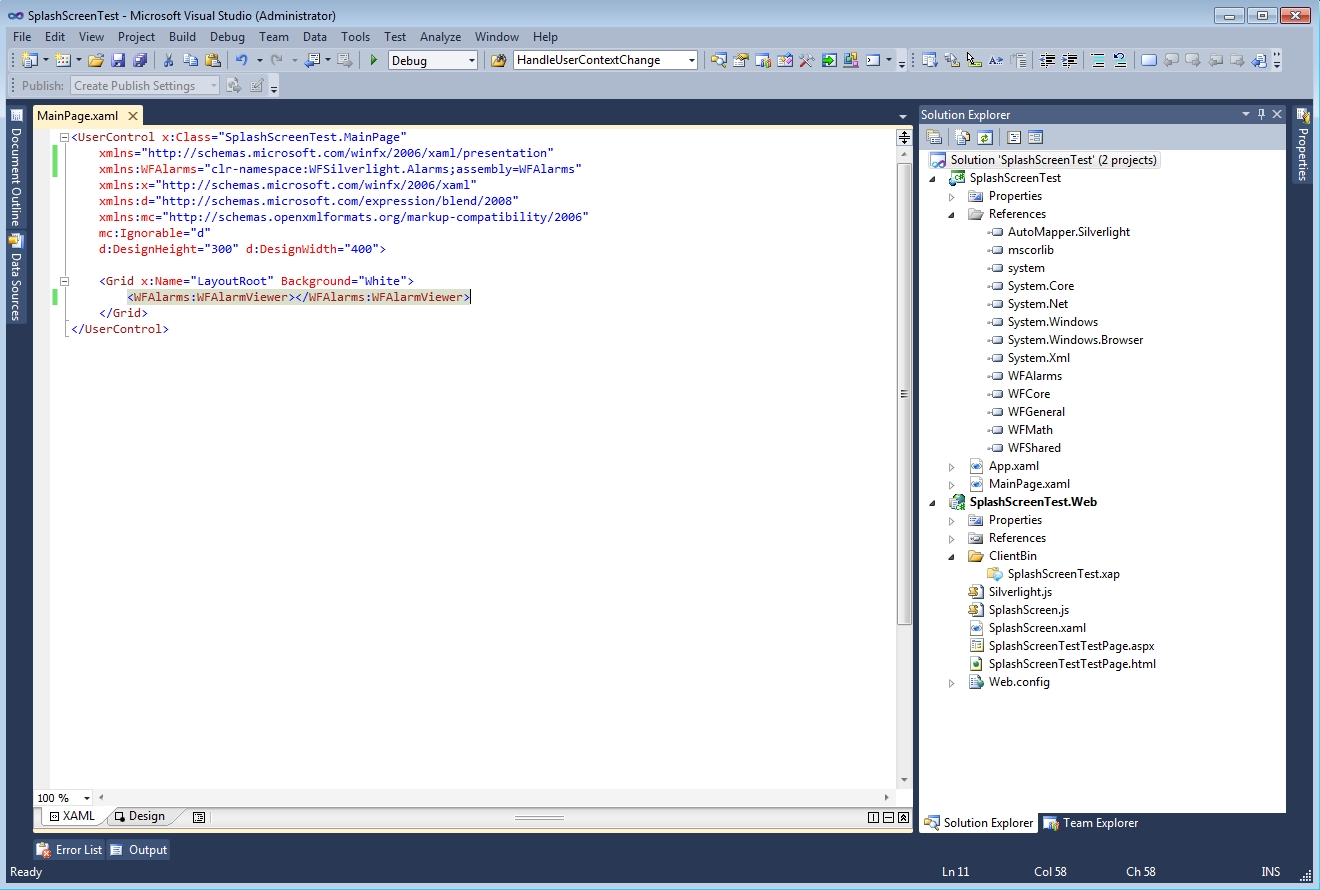
In our example, we will use the SplashScreenTest example project. The example project we use for tutorial purposes contains an AlarmViewer control. The control is placed in the project to increase the loading time, allowing us to have a longer view of the splash screen.
Adding the custom splash screen
The first step is changing the SplashScreenTest.Web Start Action default page from .aspx to .html:
Right-click the Web project in your solution (SplashScreenTest.Web in our example) and select Properties (alternatively, select the Web project and press Alt + Enter).
Select the Web tab and change the Start Action from Current Page to Specific Page.
In the Specific Page option, select the html page of your project (SplashScreenTestTestPage.html in our example).
Save the changes by pressing the Save button or pressing Ctrs + S.
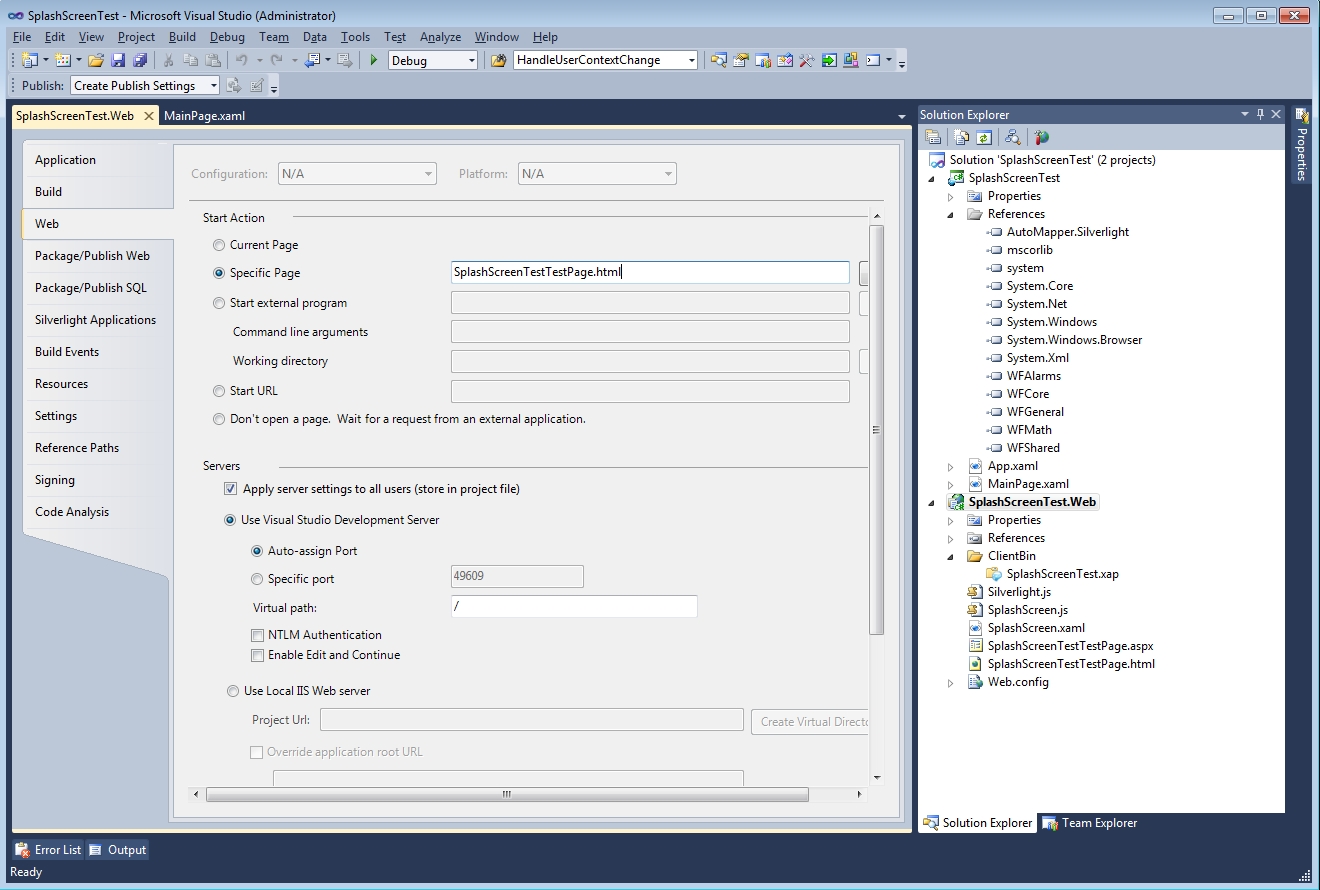
Selecting the Start Action for the Web project
The next step is adding the actual splash screen XAML to the project:
Right-click the Web project and select Add > New Item.
In the Add New Item dialog, select Silverlight from the Installed Templates section, and select Silverlight JScript Page.

Adding the splash screen XAML
Name the page as desired (in our example, the name is SplashScreen.xaml).
Open the new splash screen xaml page if not already open. Here, the actual xaml code of the splash screen will be placed. For demonstrative purposes, we will provide a simple loading splash screen to be used in this tutorial.
Paste the following XAML code in the splash screen xaml page, replacing the existing code:
<Canvas
        xmlns="http://schemas.microsoft.com/winfx/2006/xaml/presentation"
        xmlns:x="http://schemas.microsoft.com/winfx/2006/xaml"
        x:Name="parentCanvas">

  <Canvas Canvas.Top="400" Canvas.Left="600" Width="357" Height="31.379">
    <Rectangle Width="27.545" Height="1" x:Name="uxProgress" Canvas.Top="29.545" Canvas.Left="1.4">
      <Rectangle.RenderTransform>
        <TransformGroup>
          <ScaleTransform x:Name="uxProgressBar" ScaleX="1" ScaleY="0"/>
          <SkewTransform AngleX="0" AngleY="0"/>
          <RotateTransform Angle="270"/>
          <TranslateTransform X="0" Y="0"/>
        </TransformGroup>
      </Rectangle.RenderTransform>
      <Rectangle.Fill>
        <LinearGradientBrush EndPoint="1,0.5" StartPoint="0,0.5">
          <GradientStop Color="#CCCCCCCC" Offset="1"/>
          <GradientStop Color="#CCCCCCCC" Offset="0"/>
          <GradientStop Color="#DDDDDDDD" Offset="0.28"/>
          <GradientStop Color="#DDDDDDDD" Offset="0.72"/>
        </LinearGradientBrush>
      </Rectangle.Fill>
    </Rectangle>

    <TextBlock x:Name="uxStatus" Height="25" Canvas.Left="125" Text="Loading..." TextWrapping="Wrap" Canvas.Top="6.16"/>

    <Path Width="356.85" Height="1" Fill="#FF3A3A3A" Stretch="Fill" Stroke="#FF000000" Canvas.Top="0" Data="M0,170.5 L356.84209,170.5" Opacity="0.35"/>
    <Path Width="1.662" Height="29.03" Fill="#FF3A3A3A" Stretch="Fill" Stroke="#FF000000" Canvas.Top="0.48" Canvas.Left="0.2" Data="M360,168 L360,0" Opacity="0.35" />

    <Path Width="357.84" Height="1" Fill="#FF3A3A3A" Stretch="Fill" Stroke="#FF000000" Canvas.Top="29" Data="M0,170.5 L356.84209,170.5" Opacity="0.35"/>
    <Path Width="358.85" Height="1" Fill="#FFA2A2A2" Stretch="Fill" Stroke="#FF000000" Canvas.Top="30" Data="M0,170.5 L356.84209,170.5" Opacity="0.25"/>
    <Path Width="1.662" Height="30" Fill="#FF3A3A3A" Stretch="Fill" Stroke="#FF000000" Canvas.Left="356.01" Data="M360,168 L360,0" Opacity="0.35" Canvas.Top="-0.498"/>
    <Path Width="1" Height="31" Fill="#FFA2A2A2" Stretch="Fill" Stroke="#FF000000" Canvas.Left="357.333" Data="M360,168 L360,0" Opacity="0.245" Canvas.Top="-0.498" />
  </Canvas>
</Canvas>
More information on Silverlight splash screens can be found here
The next step is editing the HTML page from the project (SplashScreenTestTestPage.html in our example):
Open the HTML page from your Web project and navigate to the <body> tag.
Look for the parameter definition in the Silverlight object element area.
Add the following parameters to the parameter list:
	  <param name="splashscreensource" value="SplashScreen.xaml"/>
          <param name="onSourceDownloadProgressChanged" value="onSourceDownloadProgressChanged" />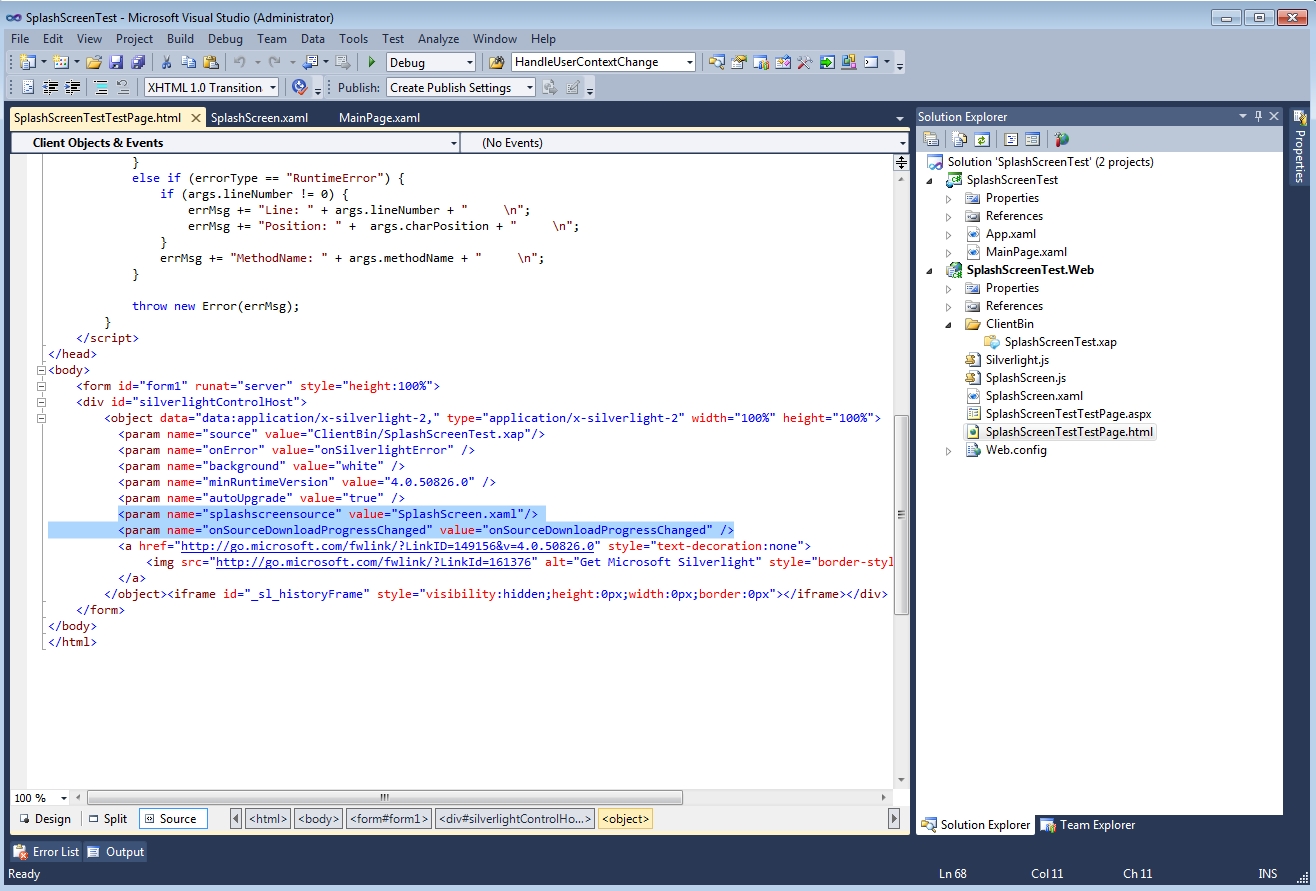
Adding parameters to the HTML page.
The first parameter added above specifies the splash screen source. It points to the splash screen XAML file we have just created.
Adding the JavaScript funtion to update the animation
The second parameter element we have just added is referencing a JavaScript event handler, which we will define next:
Locate the .js file in your Web project (in the Solution Explorer). Open the file for editing.
For demonstrative purposes, we will provide a JavaScript function that will update the progress bar from the provided splash screen XAML code. Replace the existing code from the .js file with the followind function:
function onSourceDownloadProgressChanged(sender, eventArgs) {
    sender.findName("uxStatus").Text = "Loading: " + Math.round((eventArgs.progress * 1000)) / 10 + "%";
    sender.findName("uxProgressBar").ScaleY = eventArgs.progress * 356;
}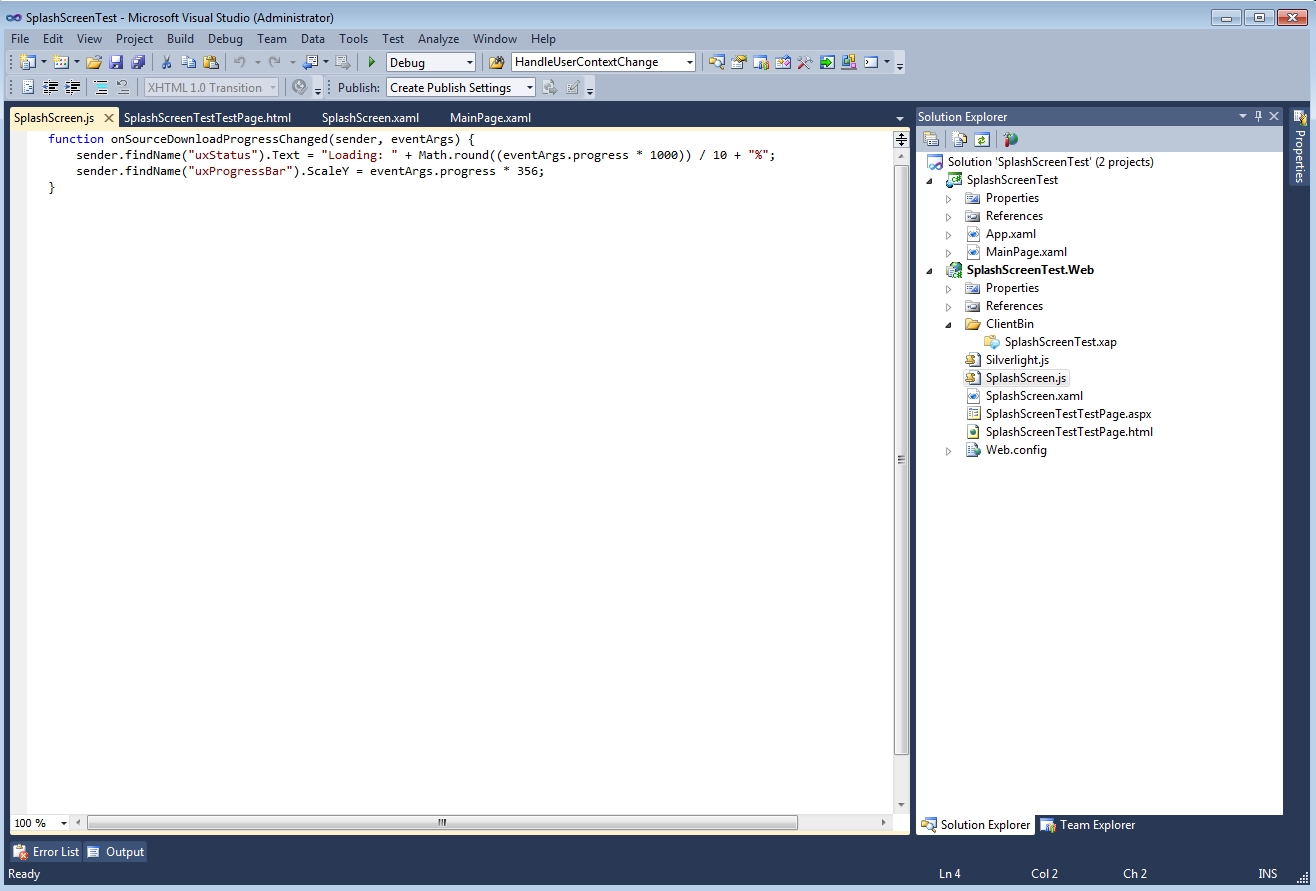
The splash screen JavaScript update function
Now that we have the JavaScript event handler, we need to reference it in the HTML page:
Return to the Web project's HTML page. Locate the <head> element.
Right below the <head> tag, reference the JavaScript script that contains our update function:
<script type="text/javascript" src="splashscreen.js"></script>
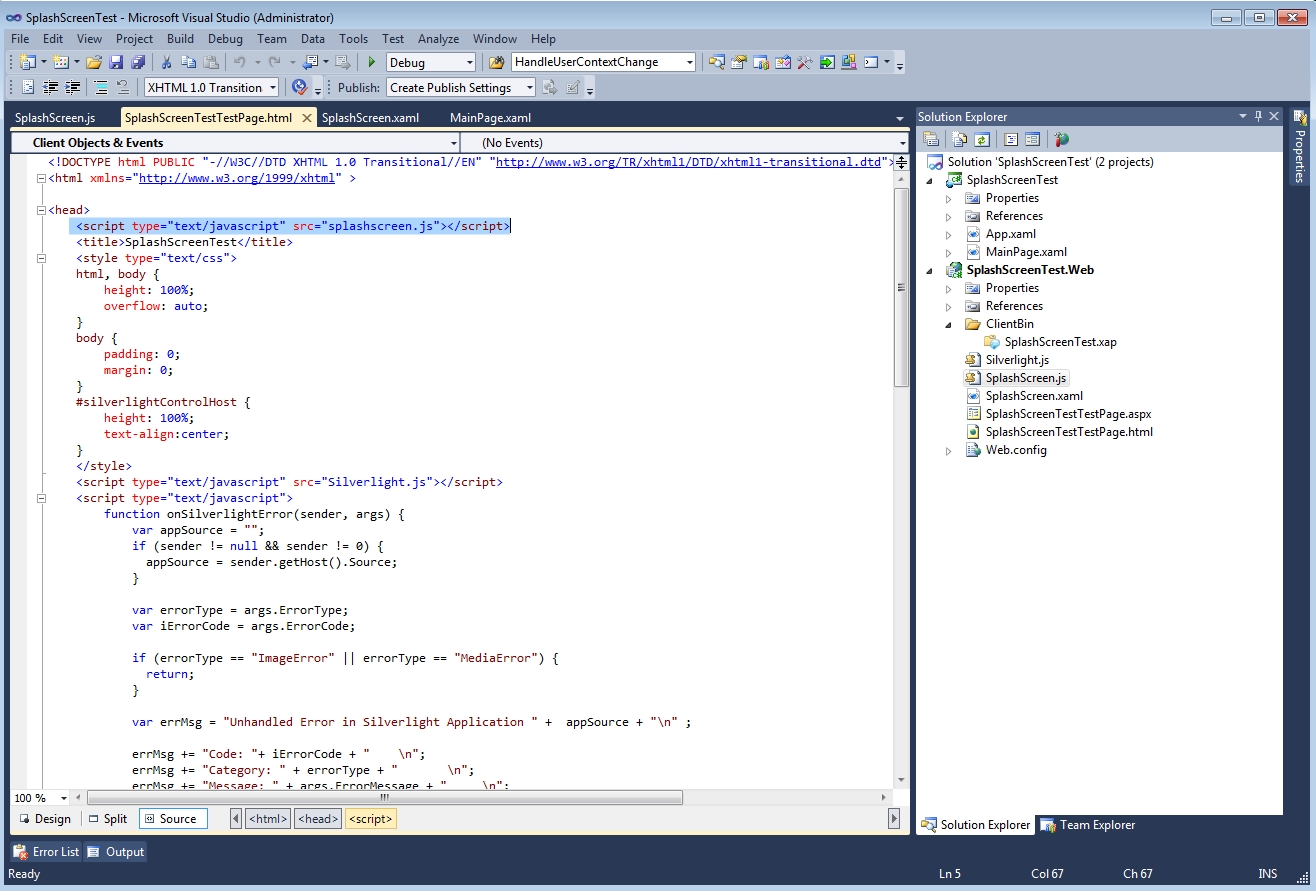
The HTML file with the script reference
Build and run the project. When run, the project will load the HTML file (as defined in the first steps) and load the splash screen.
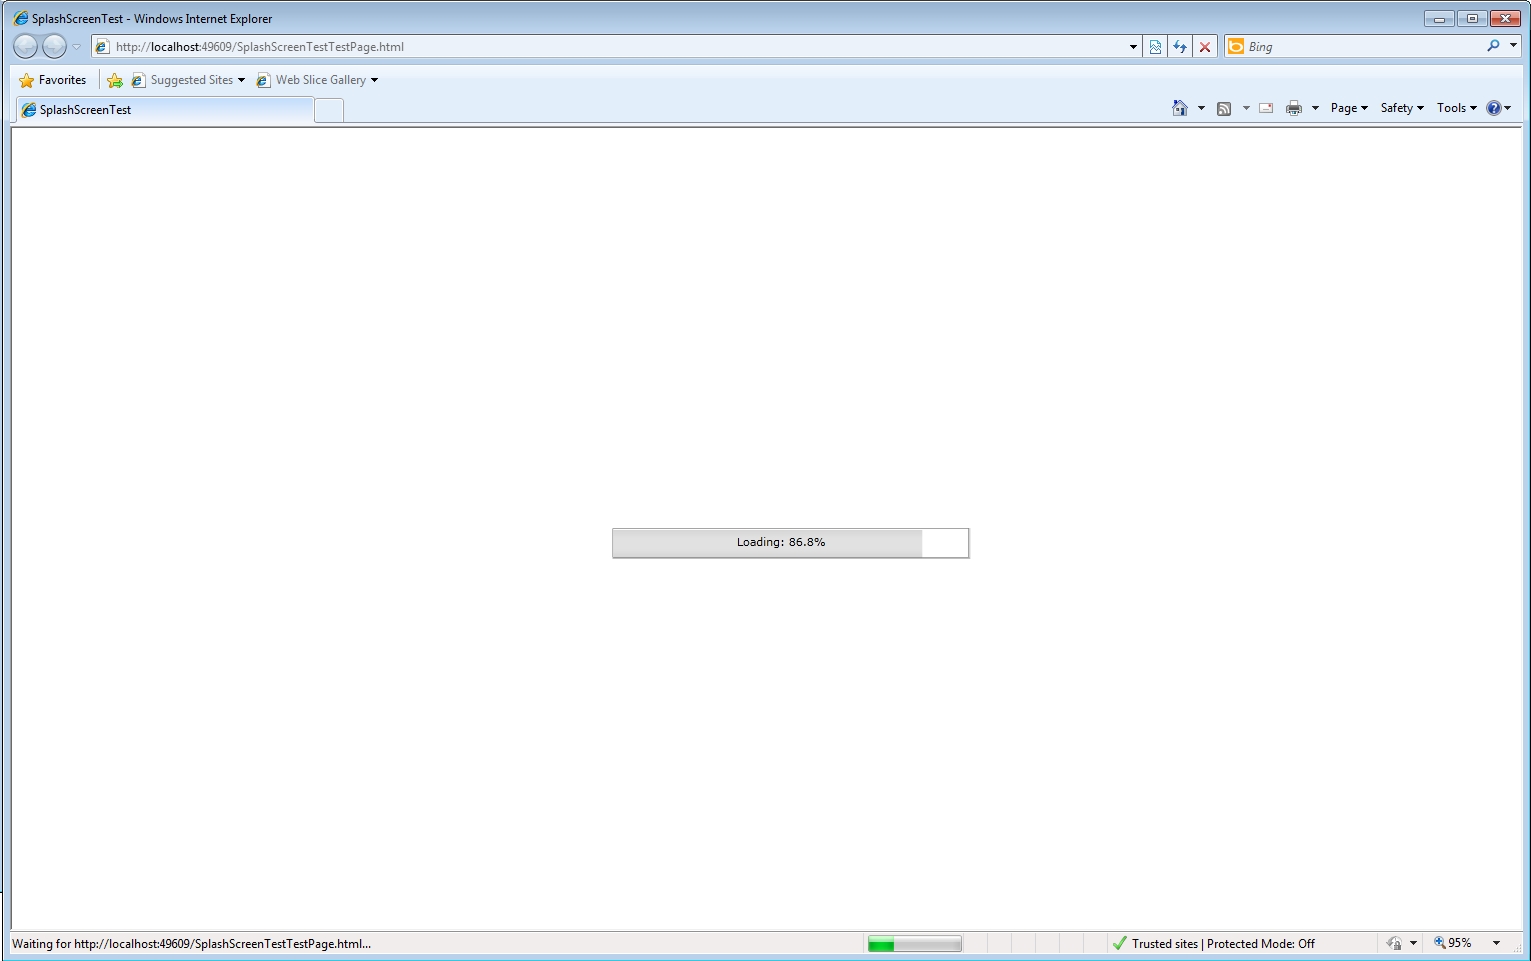
The provided custom splash screen