Managing i4connected users and roles
Check out this article and learn more details about working with i4connected users and roles.
For a better understanding of the new i4connected 5.6 security concept, the following tutorials will guide you through a hypothetical use case in order to demonstrate how to set up a closed user group.
In many situations, you may need a closed group that is interacting in the i4connected system only within a local area, in the context of a certain site, area, or organizational unit. Other situations, may require that some members of that closed group also need to see the whole content system but have no or limited management permissions.
Due to the fully customizable i4connected security settings, a properly configured system can meet any expectations.
Tip
Before going through these tutorials please also read the i4connected Role management article, in order to properly understand the security concept introduced by the i4connected 5.6 version.
Adding a new Default Front-End role
The first step in setting up your user group is the definition of a Default Front-End role.
A Front-End role is hard-coded permission combining a set of login authorizations, that all new users require in order to be able to access the i4connected portal.
In order to make sure that new users aren't restricted from accessing the i4connected portal, having a Front-end role set as Default will simplify the work of a system administrator, as follows:
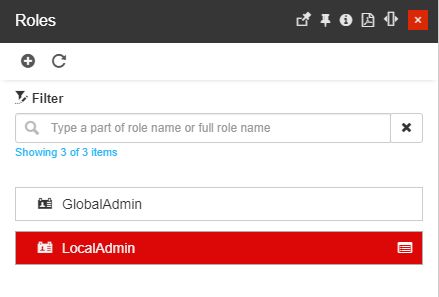
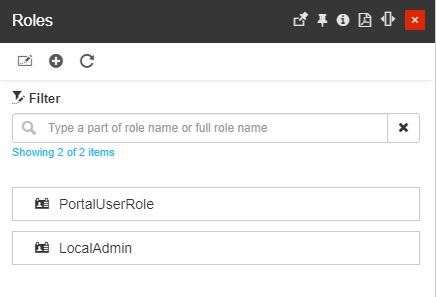
In the administration section of the i4connected portal, navigate to the Roles panel.
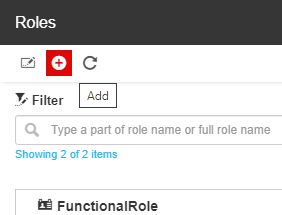
In the Roles panel click the Add toolbar button.
Note
The Add roles function is available only for users having the Configure security permission enabled.

In the Add role panel proceed with the following settings:
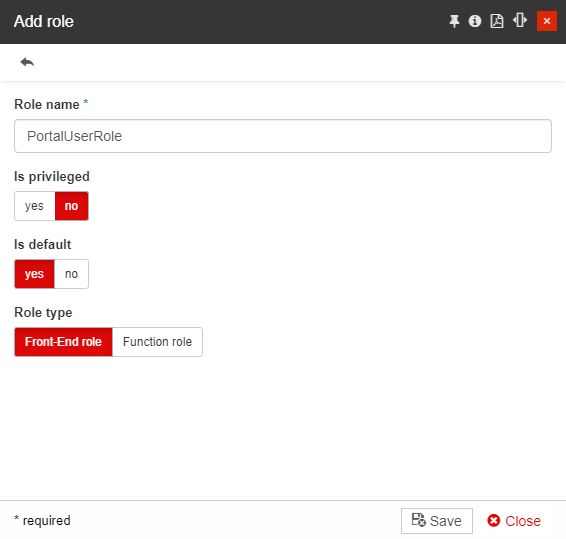
Type in the new Role name.
Make sure that the Is privileged toggle button is set to No.
Toggle the Is default button to Yes.
Note
All new users will automatically receive all default roles, sparing the system administrator from further manual work.
Toggle the Role type selector to the Front-end role type.
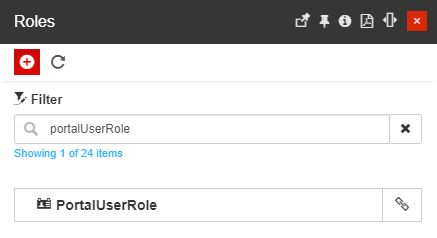
Click the Save button and check the Roles list. The newly created role is visible in the list view.
Adding Function roles
After setting up the Default Front-End role, we need to proceed with defining a set of Function roles.
A Function role is a fully customizable role allowing the system administrator to enable any of the listed permissions. Function roles are usually non-default, hence the system administrator would need to manually assign them to users, as we shall see in the upcoming sections of this article.
To properly distribute user's permissions and restrictions, the system administrator should add multiple Function roles customizing them as desired.
This tutorial demonstrates how to define two general Function roles that most of the systems might need:
GlobalAdmin role which will enable SuperAdministrator rights to a user, allowing him / her access over the entire content.
LocalAdmin role which will enable the user with administrator rights over a certain entity and its users.
Adding a GlobalAdmin role
In the administration section of the i4connected portal, navigate to the Roles panel.
In the Roles panel click the Add toolbar button.
Note
The Add roles function is available only for users having the Configure security permission enabled.
In the Add role panel proceed with the following settings:
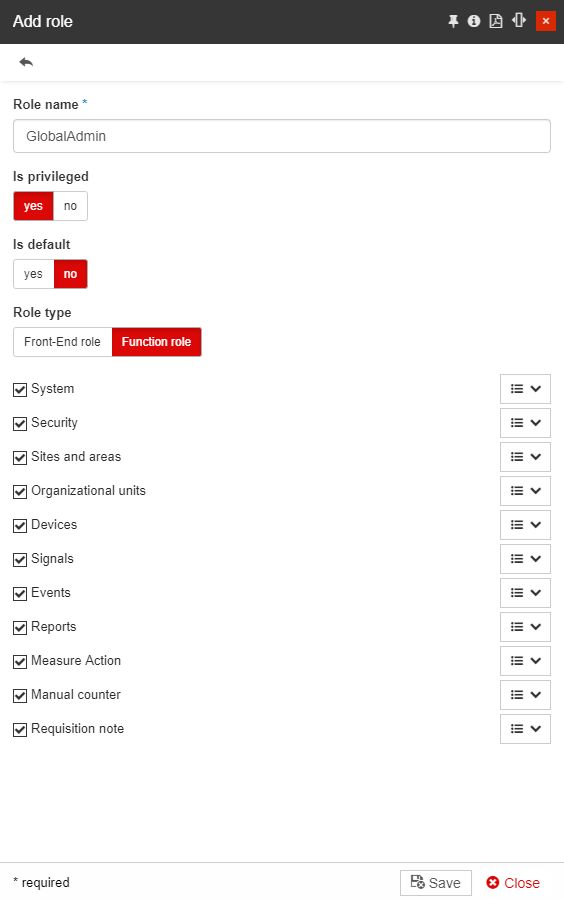
Type in the new Role name.
Make sure that the Is privileged toggle button is set to Yes.
Note
As we are currently defining a super-administrator role, we want to make sure that the user having this role assigned will not encounter any limitations, which is usually implied by items marked as privileged.
Make sure that the Is default toggle button is set to No.
Toggle the Role type selector to Function role type.
Mark all permission categories check-boxes.
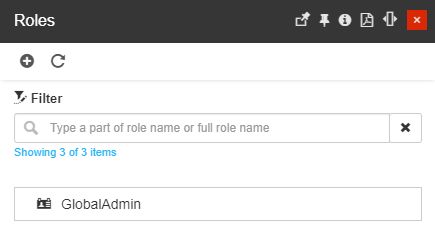
Click the Save button and check the Roles list. The newly created role is visible in the list view.
Adding a LocalAdmin role
In the administration section of the i4connected portal, navigate to the Roles panel.
In the Roles panel click the Add toolbar button.
Note
The Add roles function is available only for users having the Configure security permission enabled.
In the Add role panel proceed with the following settings:
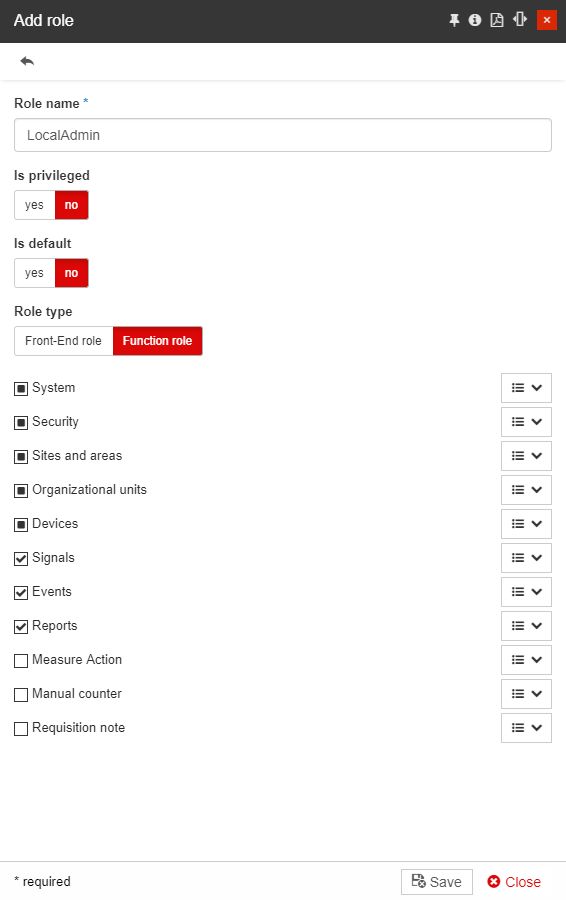
Type in the new Role name.
Make sure that the Is privileged toggle button is set to No.
Make sure that the Is default toggle button is set to No.
Toggle the Role type selector to Function role type.
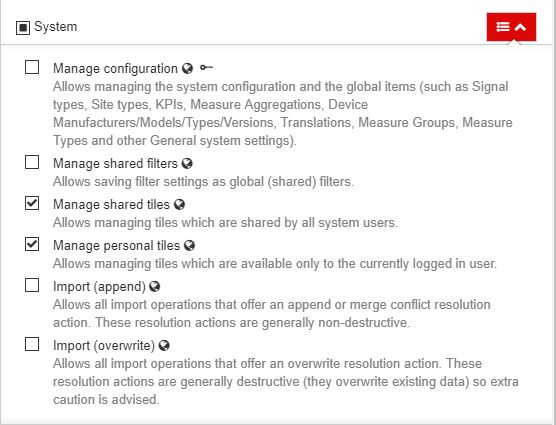
Expand the System category and mark the check-box of Manage shared tiles and Manage personal tiles permissions.
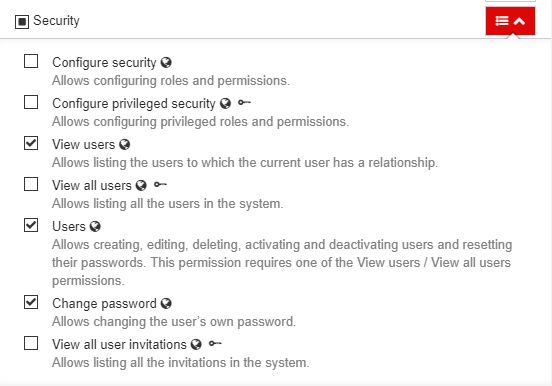
Expand the Security category and mark the check-box of View users, Users , and Change password permissions.
Expand the Sites and areas category and mark the check-box of View sites and areas and Manage sites and areas permission.
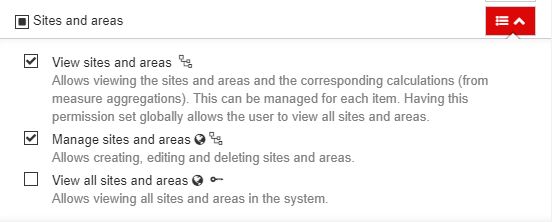
Note
These permissions are hierarchical relevant, hence they will become effective as soon as the user is assigned to a specific hierarchical entity.
For more details please also refer to the i4connected Security management articles.
Expand the Organizational units category and mark the check-box of View organizational units and Manage organizational units permissions.
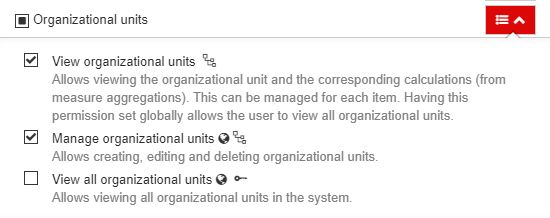
Note
These permissions are hierarchical relevant, hence they will become effective as soon as the user is assigned to a specific hierarchical entity.
For more details please also refer to the i4connected Security management articles.
Expand the Devices category and mark the check-box of View devices, Manage devices, View adapters and Manage adapters permissions.
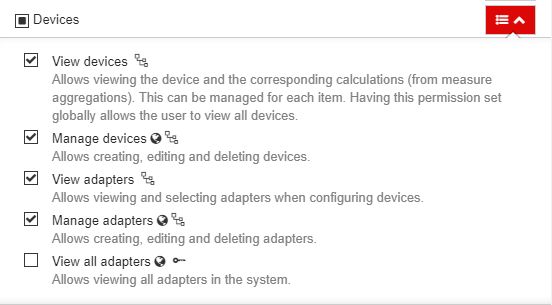
Note
These permissions are hierarchical relevant, hence they will become effective as soon as the user is assigned to a specific hierarchical entity.
For more details please also refer to the i4connected Security management articles.
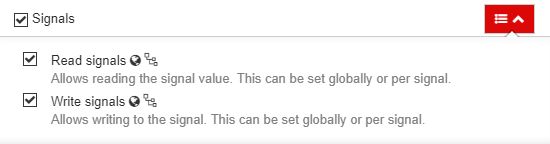
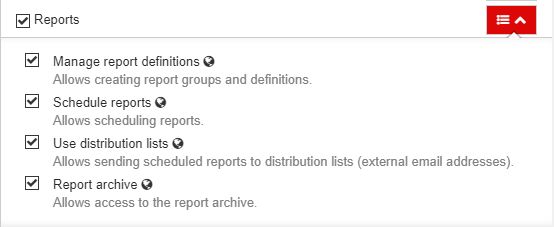
Mark the entire Signals permissions category.
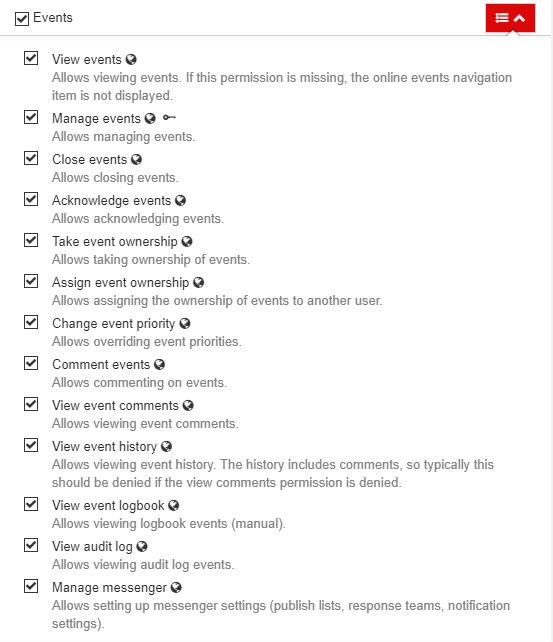
Mark the entire Events permissions category.
Mark the entire Reports permission category.
Click the Save button and check the Roles list. The new created role is visible in the list view.
Assigning a Front-End role to the i4connected Default page
As indicated in the i4connected Administrative tools section, pages can be available or hidden for users, based on their role assignments. The system administrator is required to assign roles to pages, hence making sure that all users sharing at least one role with a page, will be allowed to view and access it.
Warning
Even though a new user has been automatically granted a Default Front-End role it does not mean that this user will be allowed to start working in the i4connected portal. To avoid such situations, the i4connected Default page should be available for all system users.
This tutorial will guide you through the steps needed to make the default project page visible to all system users:
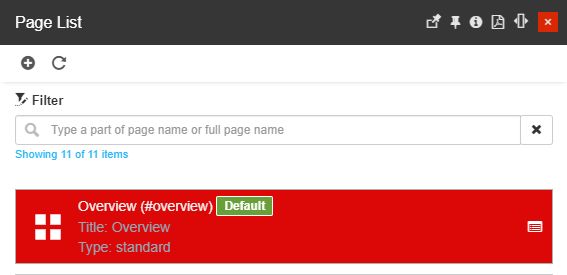
In the administration section of the i4connected portal, navigate to the Page List panel.
Select the Default page in order to make it available for all system users.
In the Edit page panel proceed as follows:
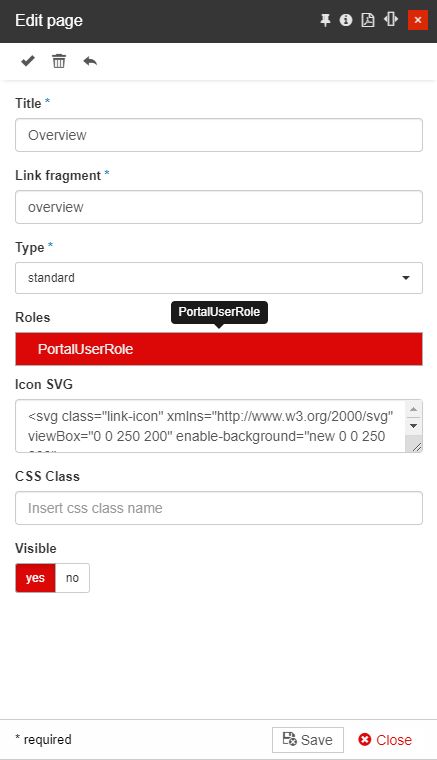
Click on the Roles selector.
Browse through the list of roles in the Select role panel.
Select your Default Front-End role, defined as described in the "Adding a new Default Front-End role" tutorial.

Click the Select button.
After adding your Default Front-End role click the Save button of the Edit page panel. As a result, all new users will have access to the default project page, where various tiles can be made available, also on roles assignments, as we shall see in the upcoming tutorial.
Making tiles visible for users on a role basis
Each project page can display a customizable amount of tiles that can be grouped and distributed by choice. This tutorial describes the steps that a system administrator needs to do in order to distribute tiles to the system users, on basis of role assignments.
Click the Edit tiles toolbar button.

When the page tiles are displayed in edit mode, click on the pen symbol of the tile you need to update.
In the Edit tile panel proceed as follows:
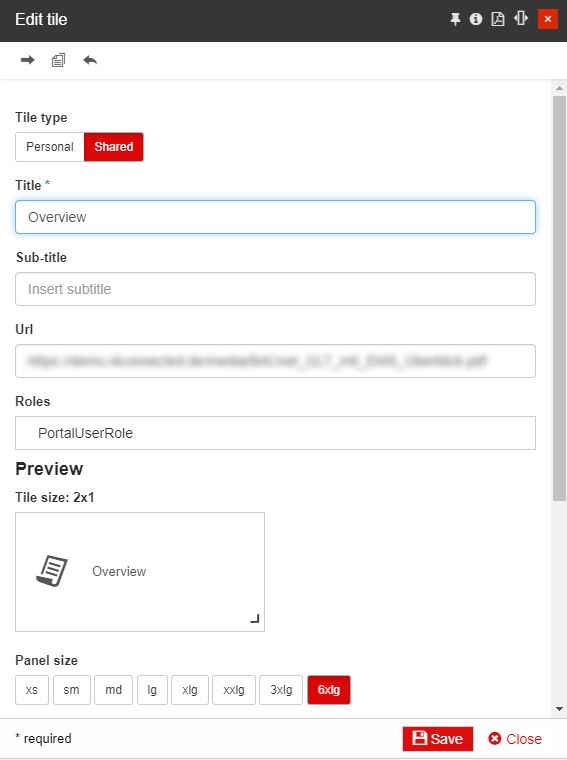
Make sure that the Tile type toggle button is set to Shared.
Click on the Roles selector.
Browse through the list of roles in the Select role panel.
Select your Default Front-End role, defined as described in the "Adding a new Default Front-End role" tutorial.
Click the Select button.
After adding your Default Front-End role click the Save button of the Edit tile panel.
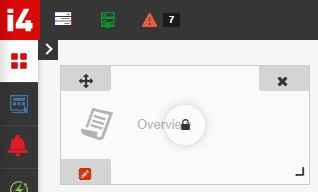
Now, all new system users will be able to access the Overview tile on the Default project page. These steps need to be organized for all the tiles on all the pages in order to ensure a logical distribution of tiles visibility.
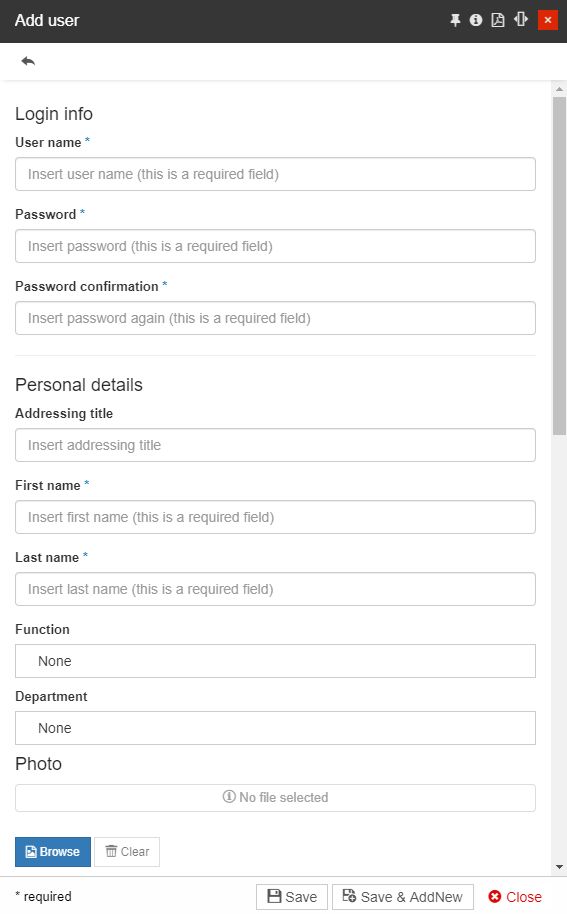
Adding a new user and checking if the user can log in
This tutorial explains how to create a new i4connected user and check what the user can see after logging in for the first time.
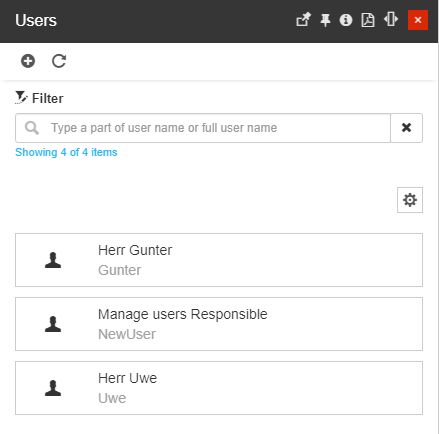
In the administration section of the i4connected portal, navigate to the Users panel.
Click the Add toolbar button.
In the Add user panel make sure to fill in at least the mandatory settings:
Tip
More details about the Add user panel settings can be found in this article.
Fill in the User name.
Fill in the user's Password.
Fill in the Password confirmation.
Fill in the user's First name.
Fill in the user's Last name.
Fill in the user's Email address.
Fill in other optional information about the new user, such as Addressing title, Phone and Fax numbers, Address, Language , and Time zone.
After filling in all the new user's information click the Save button.
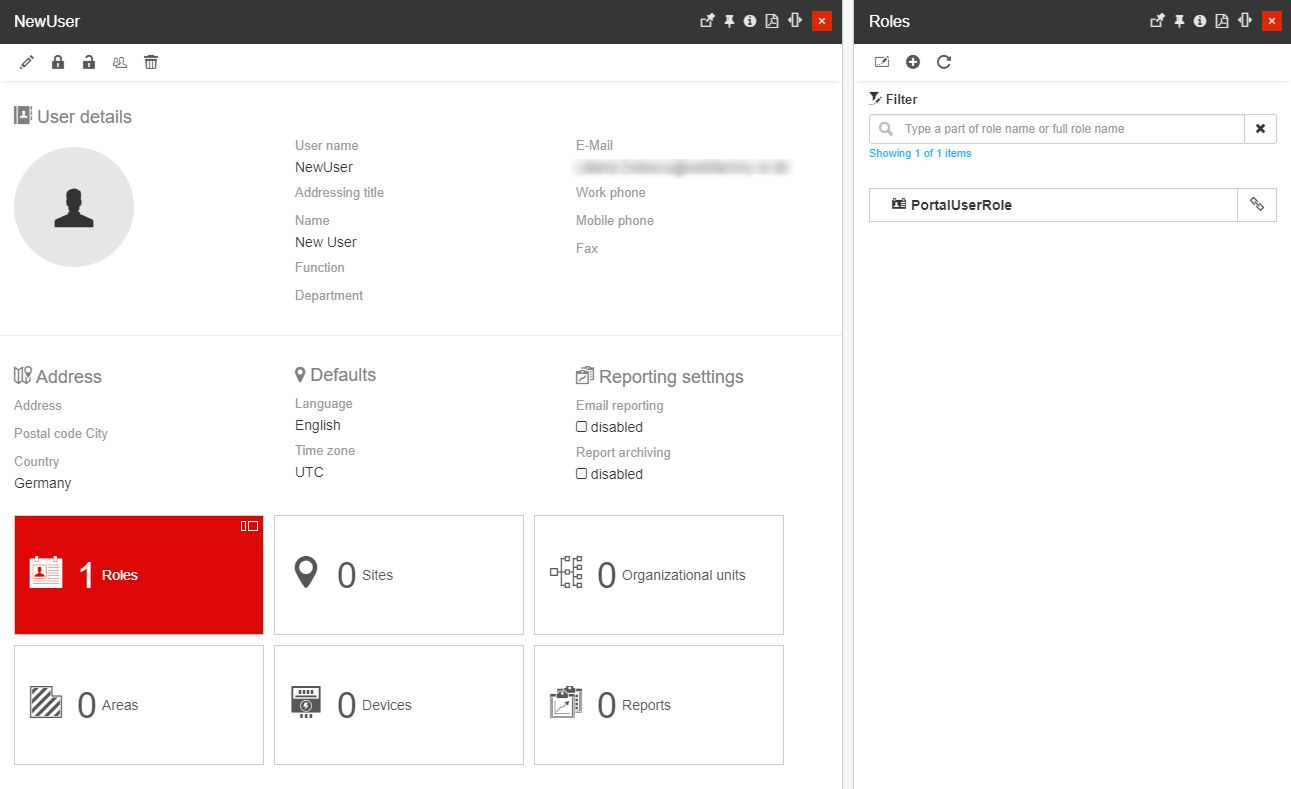
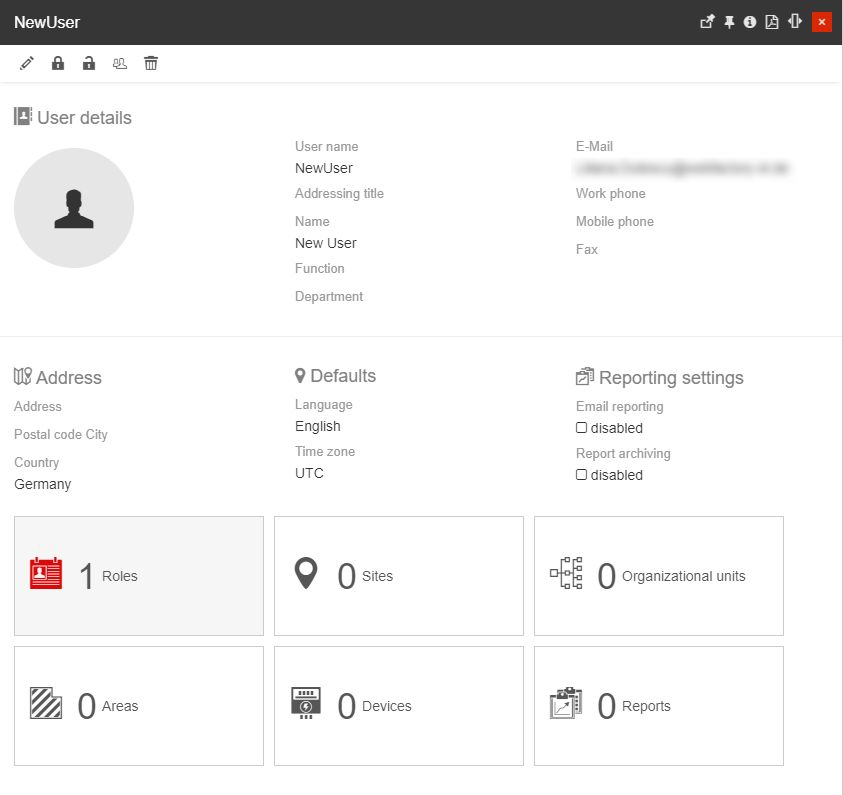
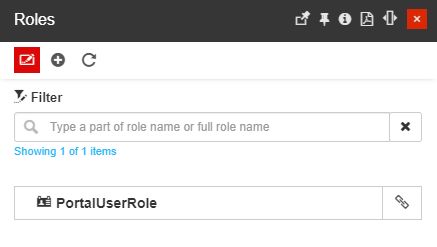
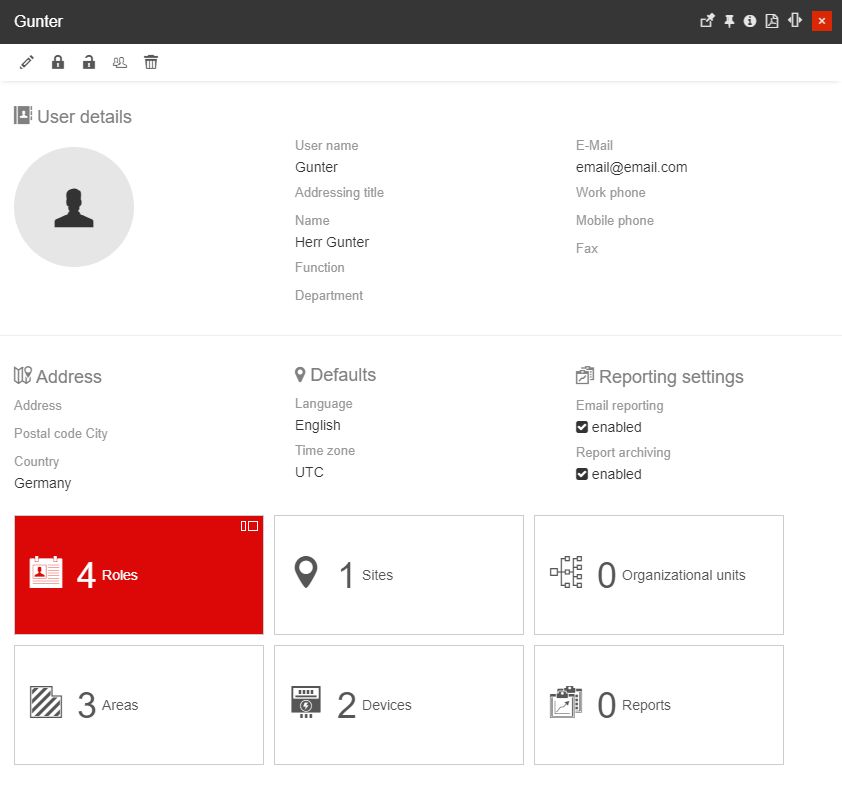
The user creation is confirmed by the system and the User details panel is opened automatically. In this view, notice that the Roles tile already displays one role. In our case, the role created in the "Adding a new Default Front-End role" tutorial has been assigned to our new user.
Tip
All the roles having the Is default option enabled will be automatically assigned to all new users,
Log out of the system and log in with the newly created user credentials.
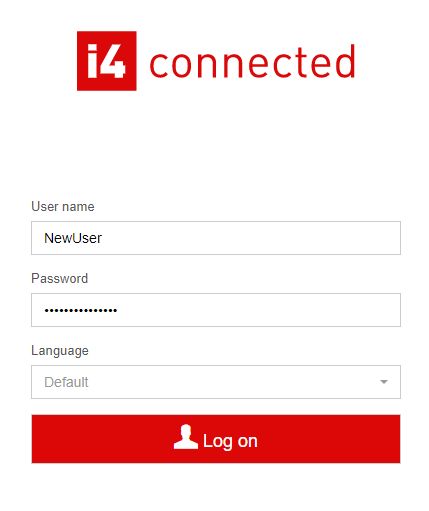
The new user is successfully logged into i4connected portal. Due to the page and tile role assignments organized during the previous tutorials, the new user can see and access them.
Updating a user's roles and permissions globally
After we have previously created a basic user having only the Default Front-End role assigned, we can update the user and provide him with more permissions.
This tutorial will guide you through a set of simple steps required to set a new user as the local administrator.
In the administration section of the i4connected portal, navigate to the Users panel.
Select the User that should be updated.
In the User details panel click on the Roles tile.
In the Roles panel click on the Change toolbar button.
Notice
Notice that one role is already available, even though previous changes did not occur in this area. The existing role is the Default Front-End role that was attributed to the user, by default, after his / her creation.
In the Select roles panel, the system administrator can choose from the list of roles and consequently click the Select button.

The Roles panel will be updated with all the added roles.
Tip
The Roles panel also allows the system administrator to add new roles to be assigned to the currently selected user, by clicking the Add toolbar button.
When adding a new role you can guide your steps on basis of the previously described steps under the "Adding a new Function role" tutorial.
Updating a user's roles with linked roles
Users having limited rights can see in the list of roles only the roles that have been globally assigned to them, as described in the previous tutorial. However, it may be the case when the user needs to provide himself or other users with a different set of roles. In order to enable a solution for these situations, the functionality of the linked role can be used.
Note
For a better understanding of the functionality of the linked role we have prepared a hypothetical situation, when a user with rights to view and manage other users from his / her own organization, needs to provide to a colleague the rights to manage reports.
However, our user does not have this permission enabled, hence he or she cannot work with reports.
As this user is granted with managing users permission and it is his / her responsibility to grant roles to other users, the system administrator can set the reports management role available for assignment, without providing the user with the actual permission to manage reports himself/herself.
List of roles before updating the user roles
As this tutorial demonstrates, our user manager responsible is not able to grant his colleagues with report management permissions:
Log in with the user that is responsible for other users' permissions management.
Navigate to the Users panel. The list of users displays the currently logged-in user and all other users available in the same organization.
Select a listed user in detailed view mode and click on the Roles tile.
In the Roles panel of the selected user click on the Change button.
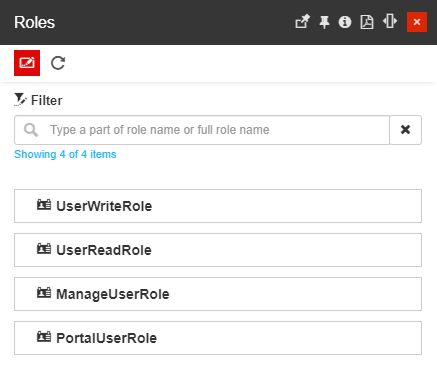
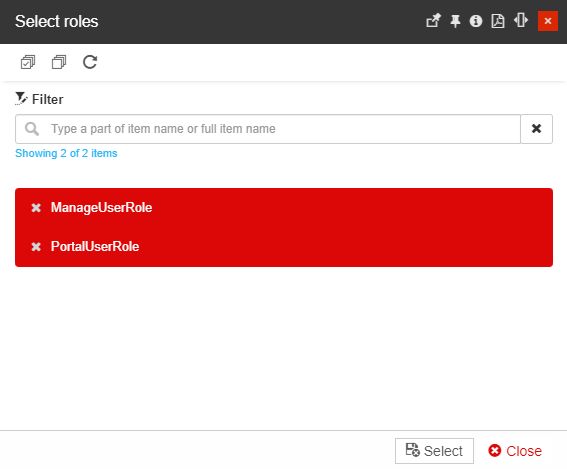
The Select roles panel displays all the roles that the currently logged-in user has. As we deal with a limited rights user, the list does not contain the needed reports management role.
System administrator updates the user's roles
Log in as a system administrator and navigate to the Users panel.
Select the user having the responsibility to manage other user roles.
In the User details panel click on the Roles tile.
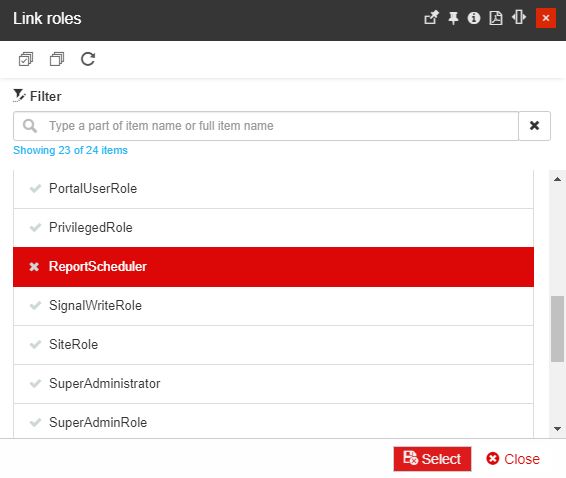
Click the Link button of the role card that should be updated with other linked roles.
The Link roles panel chose the roles that the user should have available but not actually own from a permissions point of view. In our case, we shall select the ReportRole role.
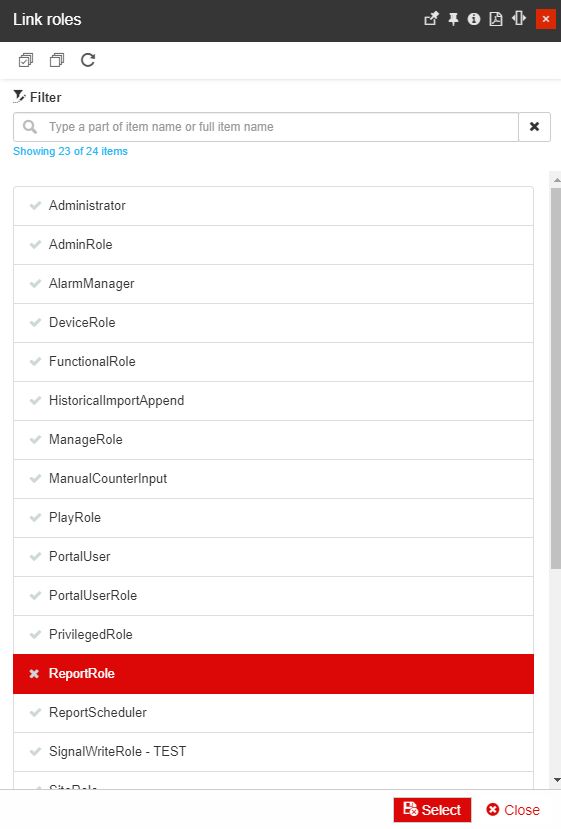
Click the Select button to apply the changes.
The selected role in the Roles panel is updated and displays the direct link relation.
Further on, the system administrator can also establish an indirect link relation, by opening the Roles panel.
In this view, the system administrator selects the role that has been previously directly linked, by clicking the Link button. In our case, we shall select the ReportRole.
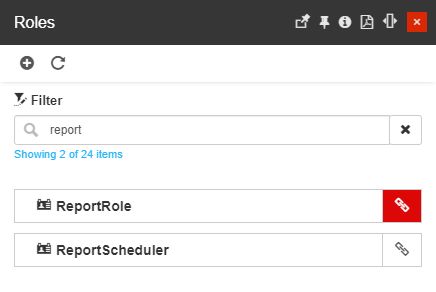
In the Link panel chose another role that will be linked to the selected role. We shall go for the ReportScheduler role.
Click the Select button.
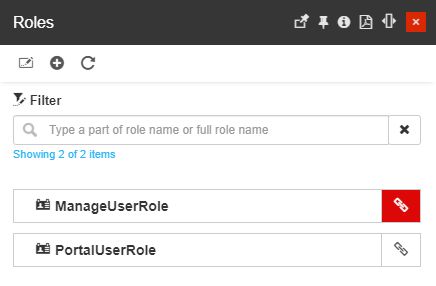
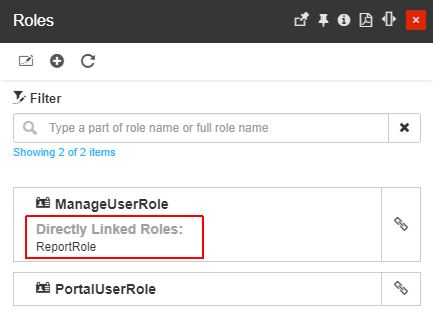
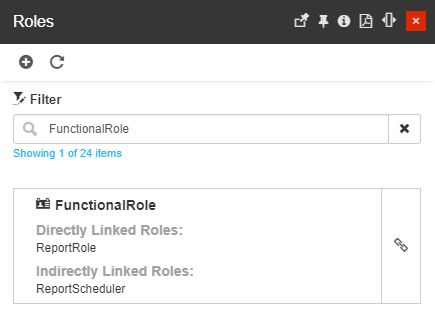
Now, the role that is assigned to our user manager responsible has a Direct link relation to the ReportRole and an Indirect link relation to the ReportScheduler role.
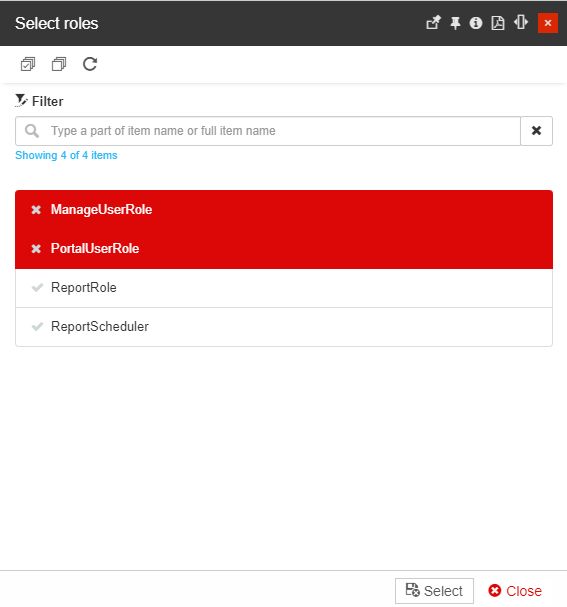
List of roles after linking roles
Let's see if our user manager responsible can now grant his colleagues the possibility to manage reports:
Log in with the user that is responsible for other users permissions management.
Navigate to the Users panel. The list of users displays the currently logged-in user and all other users available in the same organization.
Select a listed user in detailed view mode and click on the Roles tile.
In the Roles panel of the selected user click on the Change button.
The Select roles panel displays all the roles that the currently logged in user has along with the roles that the system administrator has linked for him / her.
Assigning users with roles in the context of hierarchical entities
Hierarchical entities such as Sites, Areas, and Organizational Units allow effective permissions assignments, as follows:
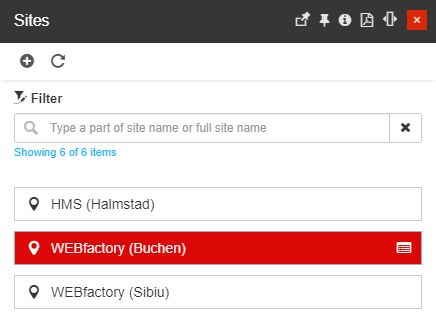
In the administration section of the i4connected portal, navigate to the Sites panel.
Select the Site where a new user should be added.
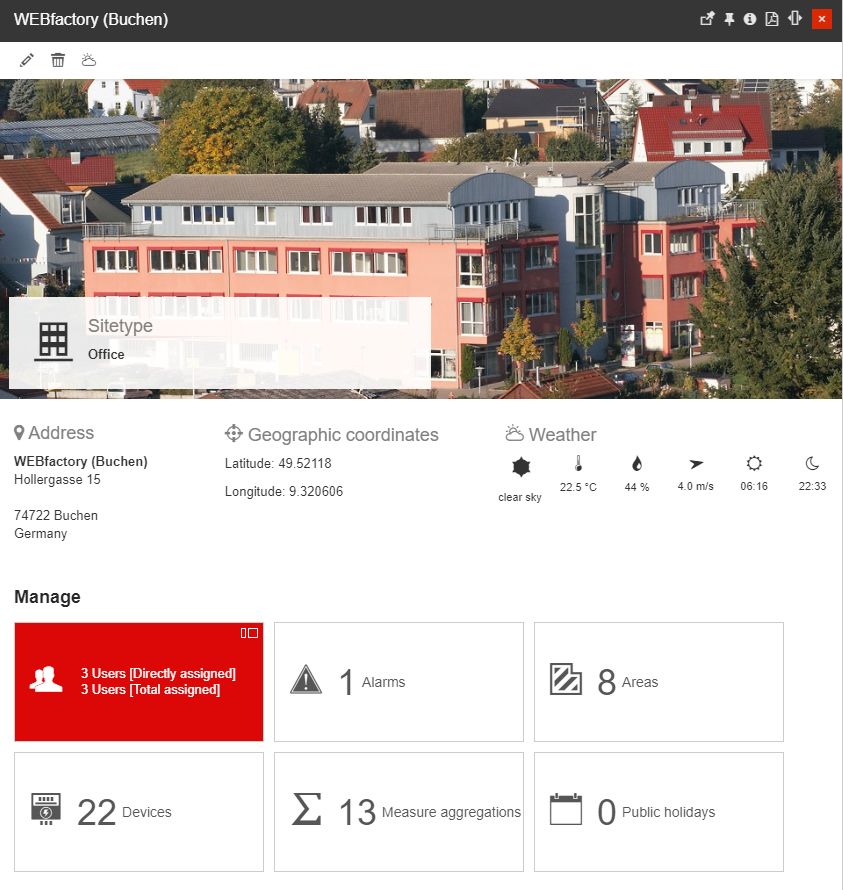
In the Site details panel click the Users tile.
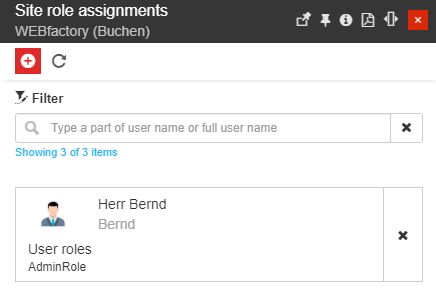
In the Site role assignments panel click the Add toolbar button.
In the Site role assignments panel click on the Select User selector, while the Select existing user toggle button is active.
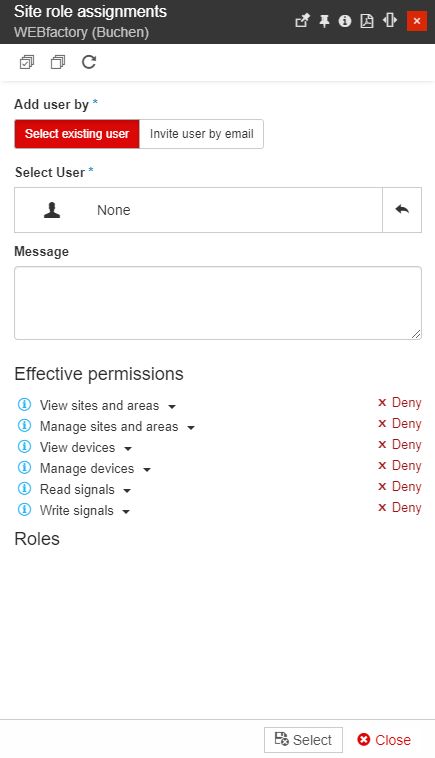
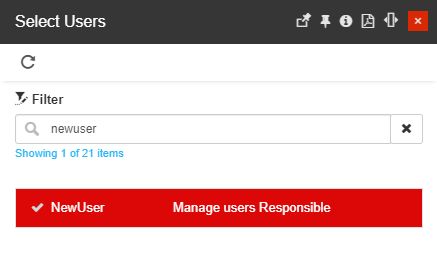
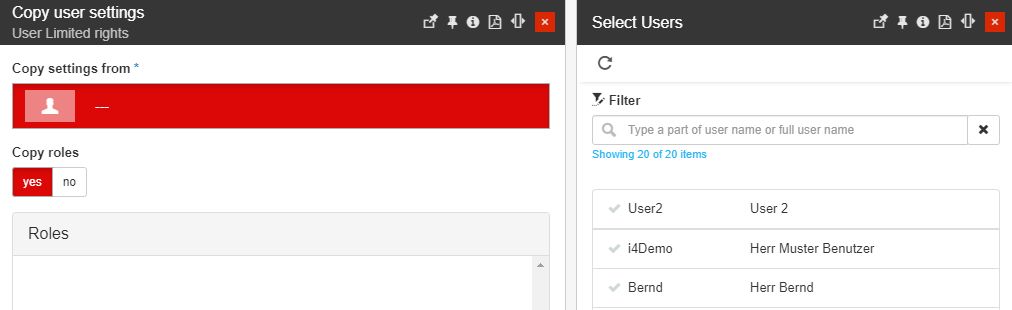
In the Select Users panel chose the user to be assigned to this Site, either by scrolling through the list or by using the filter option.
As soon as the user has been selected, the Site role assignments panel is updated with the list of potential roles to be assigned to the user, in the context of the selected Site.
Warning
Until no roles are selected from the list, all the Site's effective permissions will remain as "Deny".
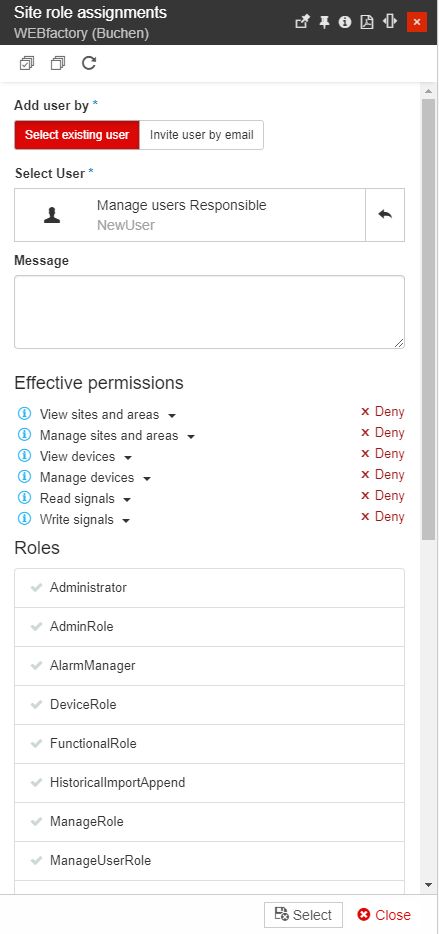
Chose the desired role(s) and follow up on the Effective permissions list.
Note
The Hierarchical Entity role assignments panel allows the selection of multiple roles. However, it is dully notable that these roles and permissions will ONLY be effective in the context of the selected hierarchical entity. For more details, please also visit our Role assignments article.
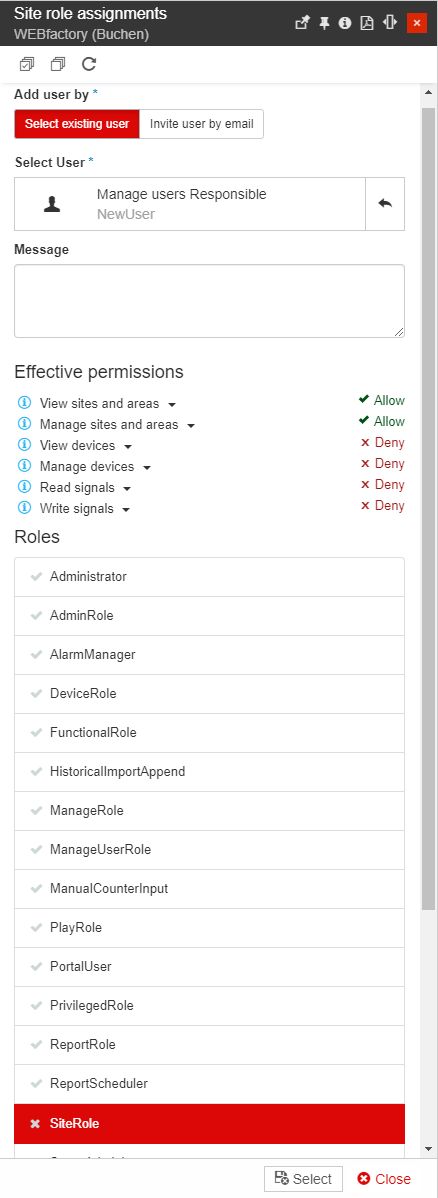
When all the desired roles and effective permissions have been assigned, click the Select button.
The Site role assignments list of users displays the added user indicating also the attributed user roles.
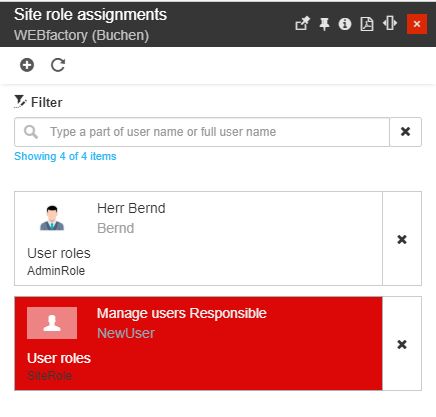
Note
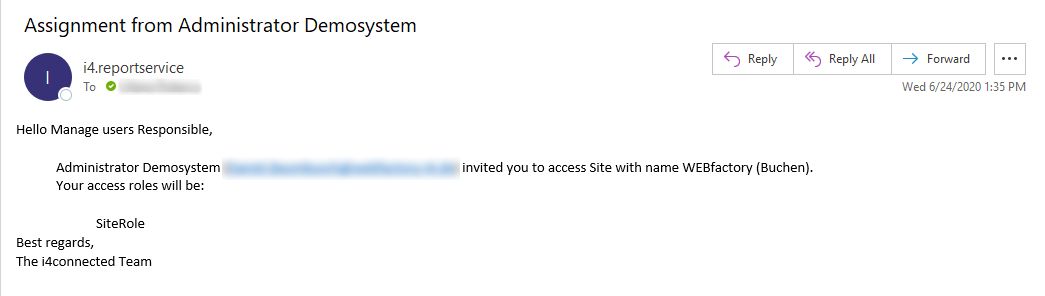
Please note that the user will be notified via Email about the Hierarchical Entity role assignment operation that the system administrator processed.
Copying user settings
This tutorial explains how to the settings of a user to another user, with the minimum amount of effort.
Warning
The Copy user settings action cannot be undone after applying the copied roles and assignments.
In the administration section of the i4connected portal, navigate to the Users panel.
Select the User that should be updated with another user's settings.
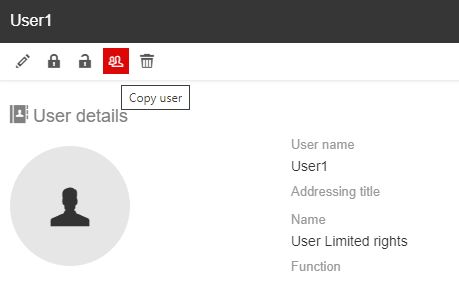
In the User details panel click the Copy user toolbar button.
Note
The Copy user settings button is available only for users having the Users permission enabled.
In the Copy user settings panel the following selections can be done:
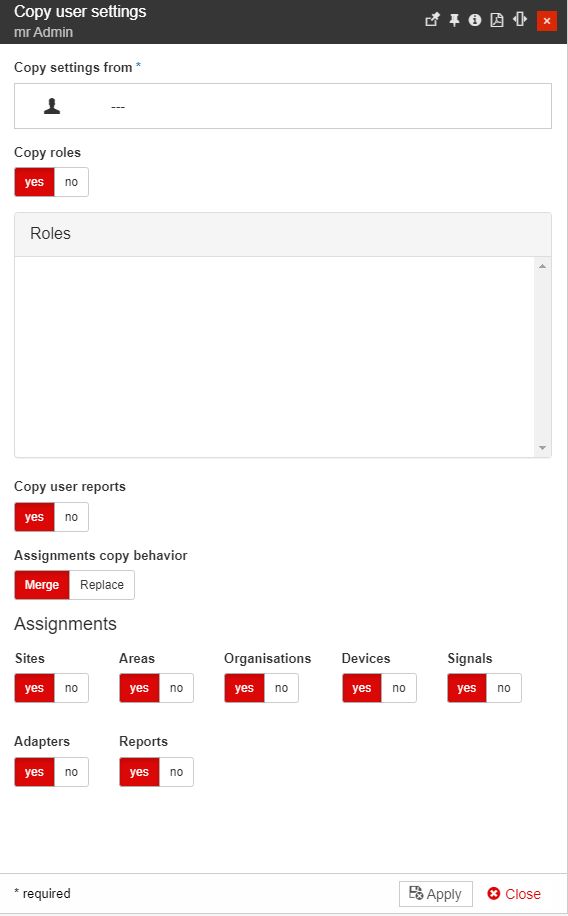
Click the selector to choose the user to copy settings from. The Select users panel allows the possibility to choose one user whose settings will be parsed to the currently selected user.
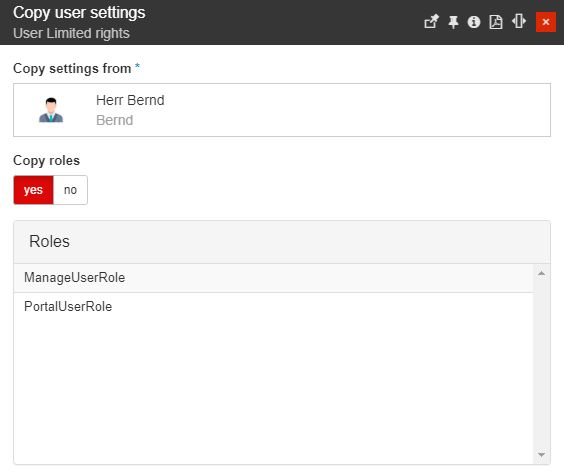
As soon as the user is selected, the Roles area is updated to display the roles of the chosen user. The Copy roles option can be toggled to Yes or No.
The Copy user reports - allows the administrator to choose if the source's copy user reports will be copied or not.

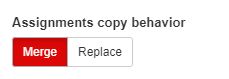
The Assignments copy behavior can be set to either Merge or Replace.
Merge behavior will add the copied assignment roles to the current user's roles and the Replace behavior will completely remove the roles of the user, adding only the copied ones.
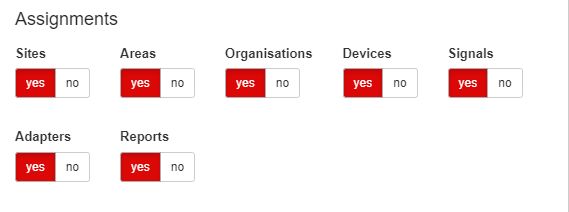
The Assignments area features all the i4connected entities carrying roles or permission settings involving Sites, Areas, Organizations, Devices, Signals, Adapters, and Signals. By toggling the Yes / No buttons the system administrator can decide which entity role assignments to copy.
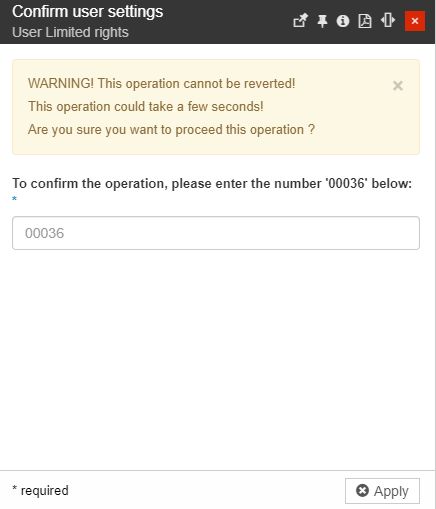
Click the Apply button to proceed with the copy action.
In the Confirm user settings panel, the system administrator is required to manually type in the provided confirmation code and click the Apply button.
By checking the updated user details panel all the copied roles and assignments are made available.
Locking and unlocking users
This guide explains how to lock and unlock an i4connected user from the administration section of the portal.
Any user can be locked out of the i4connected portal either by intentionally locking the selected user from the administration section or if the user tries to log in using the wrong password more than five times in a row. The administration section of the i4connected portal provides the simplest solution for locking and/or unlocking any user:
In the administration section of the i4connected portal, navigate to the Users panel.
Select the user requiring locking or unlocking.
In the User details panel notice the Lock selected user(s) and Unlock selected user(s) toolbar buttons.
Note
The Lock / Unlock user button is available only for users having the Users permission enabled.
To lock a user click the Lock selected user(s) button.
Note
No further confirmation is expected. The user will be locked as soon as the Lock user button is selected.
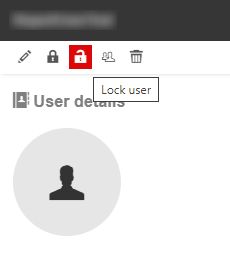
Lock user button
The user will now be locked out of the i4connected portal. The lock symbol in the Locked Out column confirms the action.

Example of the Locked user symbol
To unlock a user, simply select it from the list and click the Unlock selected user(s) button.
Note
The user will be unlocked without any further confirmation.
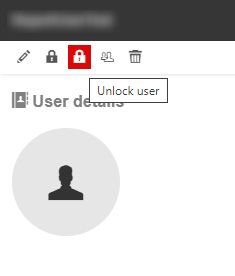
Unlock user button